Progarchives.com has always (since 2002) relied on banners ads to cover web hosting fees and all.
Please consider supporting us by giving monthly PayPal donations and help keep PA fast-loading and ad-free forever.
/PAlogo_v2.gif) |
|
Post Reply 
|
| Author | ||||||||||
Fight Club 
Prog Reviewer 
Joined: May 21 2006 Location: United States Status: Offline Points: 572 |
 Topic: Fight Club's Guide to Perfect CD Ripping! Topic: Fight Club's Guide to Perfect CD Ripping!Posted: November 29 2007 at 15:15 |
|||||||||
|
If you're like me, you want to get the best quality rips possible from your vast CD collection. After all, what's the point of ripping a CD if you're going to get lacking quality from it? If that's the case, we might as well just listen to the CD and rip no music at all, right?
So you might be wondering, "How can I get the best quality possible MP3's?" Now if you want to do this I recommend getting the greatest CD ripper ever, Exact Audio Copy. It's made for Windows, so if you have a MAC then you might as well skip passed my EAC tutorial. What I'm going to do here is guide you through the process of making a good rip from information I've gathered on various audio oriented sites such as Hydrogen Audio. This might look like a long annoying and complicated process at first, but it's actually a lot easier than it looks and you should greatly enjoy the results. I'm only going through how to rip MP3's so if you're into OGG or lossless audio (FLAC) then this guide isn't for you. Now let's get to it! Step 1: The first thing you will need to do is install EAC, which can be found here. You will also need an ASPI layer which can be found here. - After installing that copy it to the EAC installation folder (C:\Program Files\Exact Audio Copy) and then run EAC. - If it asks you to run Configuration Wizard click cancel and restart the program. Step 2: Press F12 and either enter your own email or leave the default one there. Make sure there's a server in the dropdown menu, if there isn't there's plenty to select from. Copy my settings.  Press F9 and go to the Extraction tab. Copy my settings below.  Click the General tab. Copy my settings.  Checking the "On unknown CDs" and "automatically access online freedb database" makes it so when you insert a CD the performer, track names, etc. are automatically looked up. This option saves you a lot of time from typing in all the correct information yourself. Now go to the Tools tab and copy my settings below.  Now go to the Normalize tab and copy my settings.  Now go to the Filename tab. Here you will see input fields with some text, this is where you can decide how the tracks will be named. You can make it however you like but mine looks like this:  Now go to the interface tab and check the box labeled "Installed external ASPI interface". http://www2.firehose.us:81/~jiggafellz/eac/images/interface.png Step 3: Press F10 and ignore the warning dialogue box. Select the extraction tab and copy my settings.  Go to the drive tab and from the dropdown menu select "autodetect read commands". In a few seconds EAC should show the correct read command for your drive.  Go to the offset/speed tab and check the box that reads "use read sample offset correction". For the input field value you must go to this site. Find the model number for your CD drive, if you don't know what it is go to your device manager. (Start>Control Panel>Device Manager) and then find your disk drive. The model name/number should be there then you can find it on the page. Once you find it copy the offset correction value into the input field in EAC. Mine looks something like this:  Make sure the other settings look like mine as well. Go to the gap detection tab. Copy my settings which use Detection Method A. Some drives don't work with this method, if you find yours not working use Method B.  Step 4: Here is where we have the encoder settings. This part is important as it judges the overall quality of your tracks. -Press F11 -Go to external compression -Check "use external program for compression" -Select user defined encoder from the parameter passing scheme dropdown menu. You're going to use Lame MP3 (unless you know what you're doing and want something different). The first thing you have to do is get Lame. For those who don't know Lame is the world's most popular and probably its best MP3 encoder. It's recommended by experts on various encoding and ripping sites and if you need any further convincing check out this site which explains results between various encoders during a listening test. Now open the downloaded zip file and extract Lame.exe to the EAC installation folder (default: C:\Program Files\Exact Audio Copy\) Next copy my settings. If you used a different installation path copy that in the "program used for compression" field.  On this same tab where it says "Additional Command Line Options" enter the following: -V 0 --vbr-new --add-id3v2 --ignore-tag-errors --ta "%a" --tt "%t" --tg "%m" --tl "%g" --ty "%y" --tn "%n" %s %d This command includes these settings:
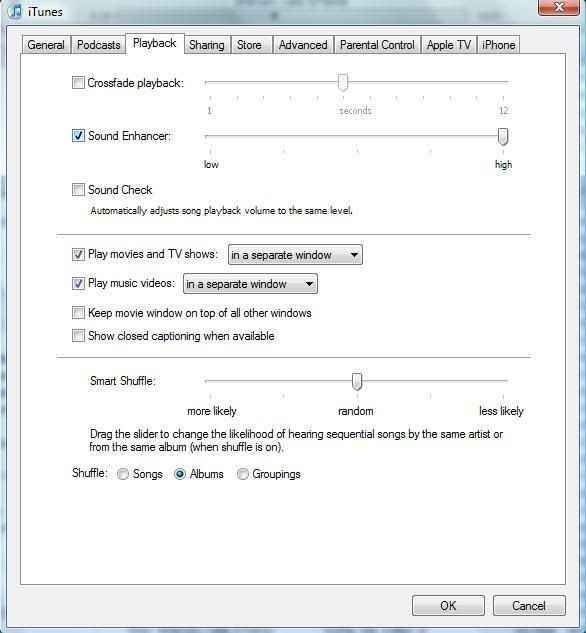
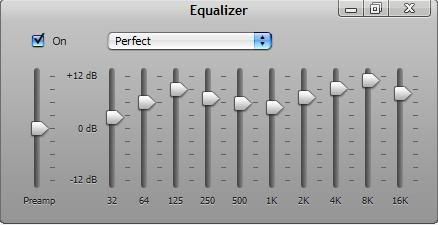
There are other encoding options, but I Highly recommend these. Next go to the ID3 tab and copy my settings.  Step 5: After all this you might want to save these settings to a file so you don't have to go through all that again each time you want to rip a CD. To do this press shift+F2.  Enter whatever name you want.  Now save wherever you wish. Step 6: Now it's time to insert the CD you wish to rip into your drive. In a few seconds EAC should return track titles and information. Make sure everything is correct and how you want it because people manually input the info on the database and sometimes make mistakes. Now what you want to do is select the tracks you want to rip. Then press F4, this allows EAC to detect gaps.  Create a CUE sheet by going to Action>Create Cue Sheet>Multiple Wave Files With Gaps. Save the .cue sheet wherever you plan to save your tracks in.  Now press shift+F6. and select save. Now EAC has started it's ripping process. It will test read each track and go through a number of processes during extraction. Sometimes another window will pop up, DO NOT CLOSE EITHER WINDOWS. MAKE SURE ALL THE ENCODING IS FINISHED BEFORE CLOSING EAC. Once you open the folder with the extracted files there should be a log sheet that contains info such as encountered errors, track quality, etc. That ends the tedious process of making perfect CD rips! From this point on it should be an easy process as you just load your configuration settings and rip the CD of your choosing. Ripping CDs with Foobar2000 If you're not as much of an audio freak as me you can save the time it takes to rip a CD with EAC by using Foobar2000 instead. Obviously the first thing you will need to do is install the program After that everything is pretty simple. Just pop in a CD and go to File < Open Audio CD. It will add the tracks to the list pane, and after that you will want to select them and right click and go to Tagging < Get tags from freedb. This will gather track information. After that right click and select Convert < Convert to... You will have to find Lame.exe so you can encode with it. Then make sure the quality is all the way up on VBR 245 (V0). Then just choose a folder you want the files to save to and let the program do the rest. It's quite simple. After this you'll get files that aren't quite as good as EAC's rips, but are still pretty great. It's a major improvement over most free audio rippers, Windows Media Player, or the iTunes extraction system. I still recommend EAC, but the extraction takes quite a long time and if you're not willing to wait that long go with Foobar2000. Other recommended settings Now for all my music playing I choose to use the program, iTunes. For anyone who doesn't already have it you can acquire the latest version here. I prefer iTunes mostly because of its organization, but there's some other tips I can give you to vastly improve your listening experience. If you think the sound quality of Winamp triumphs over iTunes, I suggest you test out my settings and might think again. The first thing you will want to do is go to Edit and then Preferences and go to the Playback tab. Make sure the sound enhancer box is checked and the setting is on high.  Now the most important part of improving your sound quality is the Equalizer setting. After this you'll wonder how you lived so long without it. Go to View and Show Equalizer. Make yours look exactly like mine shown below:  After this click "Make Preset" and name it whatever you want. As you can see I labeled mine "Perfect". After ripping your CD's with EAC and using my recommended iTunes settings you should enjoy a vastly improved listening experience! You should also go out and buy a nice pair of speakers with a sub woofer if you don't have them already. Successfully do all this and you'll wonder how you ever lived before. Enjoy your new and improved music!  Edited by Fight Club - November 29 2007 at 15:40 |
||||||||||

|
||||||||||
 |
||||||||||
Post Reply 
|
|
| Forum Jump | Forum Permissions  You cannot post new topics in this forum You cannot reply to topics in this forum You cannot delete your posts in this forum You cannot edit your posts in this forum You cannot create polls in this forum You cannot vote in polls in this forum |